A Basic Tutorial on UTAU, OREMO, and SetParam for Making and Using Voicebanks
UTAU
Now it’s time to make your voicebank sing!
To use UTAU, there are a few things you should know about: registering voicebanks, USTs, flags, and resamplers. I’ll briefly touch upon each of these four things.
*NOTE: Some computers may not be able to recognize Japanese Hiragana or the like, so UTAU may just show a bunch of boxes and may not be able to play anything.
You may need to change the locale of your computer to Japanese. If you don’t know how, Google what to do for your system.
For Windows, at least, you’ll need to go to the Control Panel for that. You may need to keep the locale changed to Japanese for the time you are using UTAU. Don’t worry, though; all of your currently installed programs will still be in English, and your keyboard will be, too.
Registering Voicebanks
Now that you’ve made your voicebank, you probably want to register it into UTAU so that you can actually use it.
First, open up UTAU. If you get a pop-up, you might want to stop and read it. These pop-ups are telling you about the voicebank you are opening; if it is your own voicebank, they can warn you if anything in the oto.ini configurations is weird (for instance, if your Preutterance is larger than your Consonant, which doesn’t make sense at all).
If the pop-up is for someone else’s voicebank, though, ignore it; you probably don’t want to mess with the oto.ini configuration that they created, for whatever reason.
Now, you should get a screen like this:

The upper left-hand corner tells you the voicebank you are currently using. The default voicebank for UTAU is Defoko (also called Uta Utane). She comes pre-installed with all versions of UTAU.
That’s cool and all, but you want to use your own voicebank, don’t you? Then, let’s go ahead and register the voicebank.
Click “Tools → Options” to open up the settings. Then click the third tab (“Bank Regist.”). You should get this screen:

To add a voicebank, click the “Select…” button. Then navigate to the folder you put your UTAU voicebank in.
Type in the name you want, then click “Add.” And… ta-dah! You should now have a voicebank entry.

Click “OK.”
Next, go to “Project → Project Property.” Under “Voice Bank,” click on the arrow. A drop-down menu should pop up with the voicebank you just added.

Then, hit “OK.”
Hooray! You are now using your own voicebank!
Singing
Okay, so now you probably want your voicebank to sing.
Making your UTAU sing is pretty easy. Simply use the Pencil tool on the main screen, draw some notes, and enter in the lyrics to make your voicebank sing.

Dragging the Mouse tool across some notes selects them. Once you’ve selected the notes (or hit "ctrl + a" to select them all), you can go to “Play → Play Region” to play the part you just selected.
Wow! How’s it like, hearing your UTAU sing for the first time? It’s pretty fun to just draw a bunch of random notes and make your UTAU sing.
If you right-click a note you’ll see a bunch of different options:

You probably know what most of the options mean, but I’ll go over the UTAU-unique ones (Envelope, Pitch, and Property) so you know how things work.
1. Envelope.

The envelope is basically the volume control of the note. See how the red line looks? This means that this note will first start from silence, then sharply get louder, stay the same volume for the majority of the note, and then fade out at the end. This is what most envelopes look like, and should be the default you use, unless you are trying to make your UTAU sing a weird sound (or maybe make it sound more realistic- who knows?).
The top boxes are basically the coordinates for the red points you see on the graph.
You generally don’t want to mess with the Preutterance and Overlap boxes at the bottom.
The Origin button doesn’t usually do much, but if you have a crazy envelope line, you can use the Reset or Normal buttons to fix it.
2. Pitch.

Wow! This might look a bit confusing at first, but it makes sense if you take things one at a time.
Portamento is basically pitch control of the note. With this, you can fluctuate the note’s pitch to make it sound either more realistic (since people in real life do not have perfectly consistent pitch) or to account for tones (like in the Chinese language). You probably want to leave the first two bullets under the Portamento header alone; but definitely feel free to increase or decrease the amount of “control points” the note has.
I won’t go into too much detail about using Portamento, but just to give you an idea, here’s a single note without Portamento:

And here’s a note with six Portamento control points (with the note selected):

You can see where the six points are.
When you play the first note, it sounds like a solid, consistent G#. But when you play the second note, the voice will follow the Portamento line, and you can hear the voice change pitches the way you set them up. Right-clicking each control point gives you a few more options; you can play around with them until you hear the result you want.
If you are familiar with music, I’m sure you’ve heard of vibrato before. This is basically the oscillating sound of a voice, typically when singing a long note. You can play around with length, cycle, and depth until you find a nice vibrato.
This is what a note with vibrato can look like:
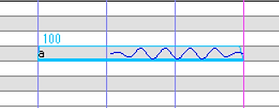
The voice’s pitch follows the line.
3. Property.

Clicking the Property option (or Region Property option if you are selecting more than one note) will give you some more details about the note. If you’re using this window, you’re most likely just changing the lyric, the BRE, or the flags. We’ll cover more on BRE (breathiness), flags, and other options later.
Otherwise, you generally want all of the default options.
Play around with some of the options and see what they can do.
USTs
It’s cool to make your UTAU sing and all, but what if you want to sing a whole song? Does that mean you’ll need to draw out all the notes from scratch and input all of the lyrics?! Won’t that take forever?!
No! Thankfully, there are these project files called “USTs” that lets your voicebank sing songs in UTAU.
You know how Photoshop project files are called .psd files, and how Paint Tool SAI project files are called .sai files? Similarly, in UTAU, project files are called .ust files.
And like how you export Photoshop and Paint Tool SAI files into .jpg and .png files, you export UTAU .ust files into .wav files.
You can share .psd and .sai files with people all across the world, and if they download them, they can access the same project on their computers. This works the same way for .ust files. You can download .ust files that people make on the Internet and use them on your own computer. You can then edit them however you like.
*NOTE: This makes the UTAU community an extremely cooperative one, because everyone is sharing all of their USTs and their voicebanks with other people across the globe. Without this cooperation, it would take people forever to sing any song with UTAU.
However! If you ever download a UST file or a voicebank to use, please, please, please credit the creator! This is like art theft, but with UTAU files. A lot of hard work goes with making things like these, and if you don’t credit them, this will simply make everyone less willing to share their projects with other people. Don’t ruin it for everyone else!
Also, please do not redistribute UST, voicebank, or oto files unless you are given permission by the creator. This should definitely be common sense that I am sure you are aware of.
So! If there is a song you have in mind, you can probably find the UST file for it with a single Google search.
Of course, most of the USTs out their are VOCALOID songs; after all, most UTAU users are fans of VOCALOID- that’s how they found out about UTAU in the first place. However, there are plenty of other JPOP and KPOP USTs out there; English, Chinese, and Spanish USTs are also on the rise as well.
*NOTE: Some songs that are too obscure or too new will most likely not have a UST made yet; if not, either you can wait for someone to make it, or you can make it yourself!
If you want to make a UST yourself, a good tutorial I’d recommend would be one by Kream-Cheese:
http://rainereizo.blogspot.com/2012/07/tutorial-how-to-make-ust.html
Of course, it helps to have some music knowledge beforehand, but if you don’t, it’s still possible to make a UST yourself.
*NOTE: Some UTAU users make a ton of USTs to share around. Four of the more well-known users (known for both the stunning amount they make and the high quality of the USTs) are Kream-Cheese, Ekkoberry (formerly EchoBlossom123), PandaLolii, and Soffie101. They cover a lot of popular songs; I’m sure you’ll find something on one of these sites that suit your taste.
(For the sake of this tutorial, I’ll be using the UST by PandaLolii for the song Outer Science by Jin.)
Once you’ve downloaded a UST you like, it’s time to use it! Open UTAU and click “File → Open.” Select the UST you’ve just downloaded. When the Project Property pop-up shows up, change the voicebank you want to use and hit “OK.”
Before you can use the UST, though, you need to change some things a bit to accommodate your own voicebank. Since different voicebanks have different oto values, you may need to change a few things.
*NOTE: The following is a simple way to fit a UST for a voicebank. It’s not the only way; nor is it the most amazing way. It’s just a quick and easy way that I find works for a lot of USTs and UTAUs, and it’s the method I use when in a time crunch because it is fast.
Click “Select → All” (or “ctrl + a”) and then right-click on a note and select “Region Property.”
Click “Clear” in the Preutterance and Overlap box, since you don’t want to use these values for your voicebank; you want to use your own values that you set in your oto.ini file. When you click the “Clear” button, the boxes should turn white.
If you keep these options in place, UTAU won’t use your voicebank’s oto.ini file as reference for all the Preutterance and Overlap values; it’ll use the values that the creator had for their UST, which is not right for your voicebank.
You generally want to delete everything in the BRE, Flags, and STP boxes if you want your voicebank to sound clear; these were used for making the creator’s UTAU sound good, but it might not work the same for your own voicebank. However, in some cases, you might want to add these in. I’ll elaborate on when you would want these values later in the next section.
Make sure the deleted boxes have turned white.
Of course, don’t delete anything in the lyric, note, or length box. Otherwise, you’ve practically reverted the UST into a bunch of notes and not a song. You might as well just make a UST from scratch, then.
The Region Property box should now look something like this:

*NOTE: Remember, “ctrl + z” also exists on UTAU! Some people forget sometimes, though I’m not quite sure how...
Next, on the main screen, click the “Reset” button on the upper-right hand corner. This resets all of the envelopes for each of the notes.
Finally, go to “Tools → Built-in Tools → A LA CARTE” for the finishing touches.
Make sure the “Connect vowels smoothly to previous note!” button is checked, and in the blank space next to the Hiragana, type in the vowels (“a,” “i,” “u,” “e,” and “o”). Then click “Slightly” in the Note Connection box. Keep all of the other boxes unchecked, and then hit “Inside Region” or “All.” If it gives you any warnings, just continue on.

This essentially tweaks the envelopes of vowel notes so that they flow and connect more smoothly with the note before it. If you look at some vowels, you can see that the envelopes have been changed, and sound smoother:
This creates a smoother transition between “do” and “a” and between “a” and “o.”

*NOTE: Don’t use the “Connect vowels smoothly to previous note!” option with “n” and “m” even though they, too, are technically one-syllable characters! Otherwise, A La Carte will change the envelopes for all notes starting with “n” and “m”- like “nu” and “mi,” even though they aren’t vowels!
*NOTE: A La Carte is the quick way to connect vowels to each other. However, often times the “better” way that many experienced users do is to manually change the envelopes for each of the vowels. But if you just want to make them sound good quickly, A La Carte does a fine job.
The other options in A La Carte are easy to use as well. You can play around with them to achieve the vocal effect you want.
Ta-dah! Now the UST should sound great with your UTAU!
Hmm… looks nice and all… but wait, what’s this?!

Why are there red exclamation marks?!
Often times this is due to weird enveloping or oto-ing. To fix, simply right-click the note, select “Envelope,” and click “Normal.”
Before:

After:

As you can see, before we fixed the envelope, the line was crossing over itself; since UTAU plays notes linearly, UTAU won’t understand how to play the overcrossing envelope.
After normalizing the envelope, though, the line is now linear, and UTAU will be able to play it.
*NOTE: If even after you hit “Normal” the line still crosses over or you still get a red exclamation mark, you may have to manually just drag one of the dots away from the other so that the line no longer overlaps.
Do this for all of the notes with red exclamation marks above them. Once you finish, you’re ready to play or export the song!
*NOTE: If the UST is too high-pitched or low-pitched for your voicebank, you may need to pitch the UST. To do so, select all of the notes and click “Edit → Move Region by Number.”
To stay on pitch with the off-vocal or instrumental of the song, you should only change the pitch by +/- 12 (because there are 12 “semitones” in an octave; 8 normal notes and 4 sharps/flats). Otherwise, the song will be off-key!
Resamplers
In UTAU, such things called “resamplers” are the ones that do all the sound file manipulations that allow your UTAU to sing. These resamplers are essentially the ones that render the notes in a UST.
To see the resampler you are using, go to “Project → Project Property.”
As you can see, I’m currently using a resampler called “resampler.exe.” This is the default resampler that is pre-installed with any version of UTAU.

To change the resampler you are using, click the “...” next to the text box of “resample.”
Different resamplers produce different results. Some of them work better with some UTAUs; some of them don’t work with some UTAUs at all! So test them out and see which works best for your voicebank.
Here are a few of the common ones:
-
resampler.exe
-
This resampler generally works with all UTAU voicebanks; however, breath sounds sometimes do not work.
-
Render rate: Fast
-
This is the default resampler. This comes with UTAU, so there is no download link.
-
-
fresamp.exe
-
This resampler is known to eliminate noise and strengthen voices, but can create nasally sounds at higher pitches.
-
Render rate: Slow
-
Download: http://bit.ly/VPQVK7
-
-
TIPS.exe
-
This resampler is known to work well with lower notes, but can turn voicebanks metallic. High notes can sound nasally. Some voicebanks don’t work with this. Only some flags work with this resampler.
-
Render rate: Medium
-
-
bkh01.exe
-
This resampler is known to be able to create some very realistic voices with the right flags, but can also create a lot of distorted, metallic, or nasally voices. A lot of common flags cannot be used with this.
-
Render rate: Medium
-
-
EFG-BT.exe
-
This resampler works very well with soft voices as it smoothes out voices nicely. However, some high notes may sound weak.
-
Render rate: Fast
-
Download: http://custom-made.seesaa.net/article/312529786.html
-
-
tn_fnds.exe
-
This resampler works a lot like TIPS; however, it may make high notes sound nasally.. It can also create strange popping or crackling sounds with some notes. A lot of common flags cannot be used with this. Some voicebanks don’t work with this.
-
One difference between tn_fnds and other resamplers is that tn_fnds uses a looping method for drawing out vowel sounds instead of stretching them. This causes longer notes to sound less metallic than with those that use other resamplers and also creates a small natural vibrato even if you don’t add one.
-
Render rate: Slow
-
Download: http://z-server.game.coocan.jp/utau/tn_fnds008.zip
-
You may also need to download FFTW files for this to work: http://www.fftw.org/install/windows.html
-
-
phavoco.exe
-
This resampler works with most voicebanks to muffle voices.
-
Render rate: Medium
-
Download: http://bit.ly/X10rMw
-
-
moresampler.exe
-
This is a fairly new resampler that works well with soft or whispery voices; however, high notes can be troublesome. It also is sometimes not as clear as TIPS or tn_fnds, and can sound a bit metallic.
-
To use this resampler, you have to set both the “append” and “resample” tools to moresampler.exe.
-
Render rate: Medium
-
Download: http://khua5.web.engr.illinois.edu/index.php/category/utau-moresampler/
-
(For all samples, I used the UST by Pancake for the song Elect by Niki.)
There are a few more resamplers out there, but try these out to see if any seem to work best for your voicebank. Otherwise, definitely feel free to Google for more. Personally, my favorites are TIPS and moresampler :)
*NOTE: You may notice that whenever you play or export something, some files called .frq, .pmk, or .llsm show up in your folder. Don’t worry about these; these are auto-generated by the resampler and are necessary for the resampler to work well. Just leave them be.
If you edit your oto.ini file, though, you need to regenerate the .frq, .pmk, or .llsm files again. So delete them from your folder; then, just use the resampler you want again, and the files should be recreated.
Flags
If you want to add special “effects” to the notes, you can add “Flags.”
You can add these special effects to the whole project (“Project → Project Property → Rendering Options”) or to each individual note/region (“Right-click → Property → Flags”).
Here is a list of flags that you can simply type in:
-
Y = Clarity
-
0 to 100 (with 100 being the most clear)
-
-
c = Filtering high-pitched noises
-
0 to 100 (with 100 being the most filtered)
-
-
B = Gravely voice
-
0 to 100 (with 0 being the least gravely)
-
-
BRE = Breathiness
-
0 to 100 (with 0 being the least breathy)
-
-
H = Muffledness
-
0 to 99 (with 0 being the least muffled)
-
-
t = Raising pitch
-
-9 to 9 (with 9 being the highest pitch)
-
Using this can cause your UTAU to sing off-key with the instrumental or off vocal.
-
-
g+ = “Gender”
-
0 to 100 (with 100 being the deepest voice)
-
-
g- = “Gender”
-
0 to 100 (with 100 being the highest-pitched voice)
-
These are not all of the flags; just some of the most common ones. You can Google up any more you want to use.
To use a flag, simply type the letter followed by the number. You can combine multiple flags together.
For example, in Project Property:
Or, in the note’s Property or Region Property:
*NOTE: Flags are case sensitive! Please be careful when you use them.
You also don’t need to put spaces in between each of the different flags.
Also note that with different resamplers and different voicebanks, some flags do not work. There are also some flags that are meant specifically for a resampler (ie. moresampler has some of its own flags meant specifically for moresampler, and for moresampler only).
*NOTE: Notice how a positive g flag value makes the voice deeper, while a negative g flag value makes the note higher; this might seem counterintuitive, but that’s how it is.
Various flag combinations can be used to make your voicebank sound smoother, clearer, softer, more robotic, more realistic, etc. so feel free to spend a lot of time with these.
Try them out! For all you know, you might find a great flag combination for your voicebank that you like to use consistently.
UTAU Add-ons
There are a ton of plugins that you can download and use for UTAU, but one such plugin I would definitely recommend is Iroiro.
Iroiro has a lot of really useful features, such as converting Romaji USTs to Hiragana and vice versa, and converting CV USTs to VCV and vice versa.
You can download it here:
http://ux.getuploader.com/bizz_v/index/1/date/desc
Download the iroiro.zip file and extract it onto your computer.
You should now have a folder called iroiro.
Find your UTAU folder (most likely in C:/Program Files (x86)/UTAU) and open the plugins folder. If a plugins folder doesn’t exist, create one.
Then, copy-paste the iroiro folder you just extracted and put it into the plugins folder.
Now open the iroiro folder. You should see a file called plugin.txt.
Edit the file in a text editor like Notepad.
It probably looks something like this:

The name you see there is the name that you’ll see in UTAU. All the Japanese could get confusing, so if you want, just rename it to “iroiro.”

When you open UTAU, you’ll see the new plugin, iroiro, under “Tools → Plug-Ins” now! If it’s not there, try clicking “Reload” and reopen the menu.

The steps you’ve just taken to install the iroiro plugin will be most likely exactly the same steps you’ll take to install any other UTAU plugin.
To use iroiro, select the notes you want to use the plugin on. Then, go to “Tools → Plug-Ins → iroiro.” You’ll see this interface:
You probably won’t need most of the buttons, but the ones you’ll find extremely useful are the Romaji → Hiragana, Hiragana → Romaji, CV → VCV, and VCV → CV options.

If you click one of the above options (for instance, Romaji → Hiragana), you’ll see something like this:

The left hand column with all the Romaji has the original lyrics of all the notes there. The right hand column with all the Hiragana is what the notes will change to if you click “OK.”
If you don’t want that output, you can type inside the output boxes and change the note to whatever you want. For instance:

Here, I simply changed the fourth note to “ka” instead of “ば.” It’s perfectly fine, and will still work.
And if I want to change all the “ba” notes, I can click the “Change all” (second rectangle) button.

Now all the notes with the lyric “ba” have been changed to “ka.”
If I want to undo this, I can press the “Revert” (first rectangle) button. This’ll revert all of the notes to their original outputs.
If I want to save this configuration (that is, for all future note changes, I want to always change “ba” into “ka”), I can press the “Save” (third rectangle) button. Now, even if I close UTAU or open a different UST, if I use the iroiro plugin, “ba” will always change into “ka.”
This means that if I hit the “Revert” button now, all the “ba” notes will still change into “ka” instead of “ば.” That’s because my new “standard” value for “ba” has been saved as “ka.” Keep this in mind whenever you want to use the “Save” and “Revert” buttons.
As you can see, this plugin is obviously very useful for converting any kind of UST to fit your voicebank.
Iroiro quite obviously isn’t the only plugin out there; there are tons more for you to download and try. Just Google for UTAU plugins if you want to try out some other nice plugins.